We're pleased to announce Early Access for 2021.09! This release includes enhanced audio file export, batch exporting, filename tokens, completely redesigned Export Audio and bounce dialogs, improved AudioSnap transient detection, several bug fixes and lots of other enhancements and optimizations.
This is a huge update with major enhancements to audio export workflow, as well as improvements to AudioSnap transient detection, so we'd love to for you to check it out and offer feedback before we release the official public version.
Please note that Early Access installers are update installers, which only update from a specific version. To install the 2021.09 Early Access build, you must be on the latest public release of 2021.06.
Should you need to revert to the 2021.06 release, you can download the Cakewalk 2021.06 Rollback installer.
If you haven't already done so, please read about the Early Access Program before participating.
Please keep responses specific to problems or comments on this release. Unrelated bugs or feature requests should be posted in other threads or the feature request channel. Thanks again for your participation!
The Bakers
2021.09 Highlights
- New export audio features
- Improved AudioSnap transient detection
- Misc. enhancements
- Bug fixes
New export audio features
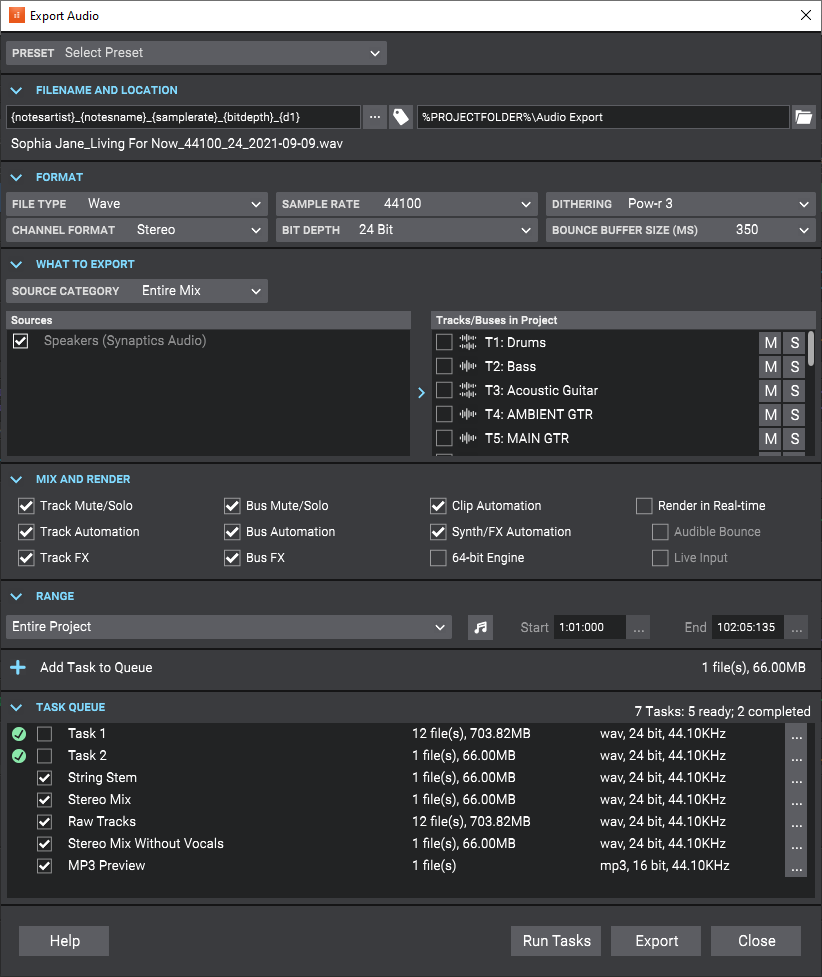
The Export Audio feature has been greatly improved and optimized to handle the most demanding rendering tasks. Highlights:
- An intuitive new UI with collapsible panels to make it easier to get to the most commonly used features,.
- Task queues for export automation.
- Complete control over output file names using tag based file name presets.
- New additional export categories available:
- "Tracks Through Entire Mix" for track stems, exports the audio from each chosen track as heard through the main output. This is a useful way to create track stems as heard through master effects.
- "Arranger sections" allows you to export each individual arrangement section as a separate audio file.
- Export uses significantly less memory and runs faster by eliminating making an extra copy of the project in memory.
- Support for setting the export buffer size independently from the audio driver buffer size.
- Convenient access to select and mute or solo tracks directly from the export UI.
- Set export time ranges or export entire project directly from the export UI.
- Automatic effects tail flushing is now part of export/bounce to prevent left over effects tails from leaking into exports or being heard.
- New default Export Audio Files folder setting in Edit > Preferences > File - Folder Locations.
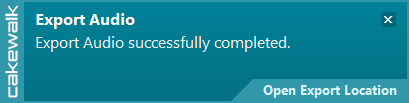
- Toast notification on export completion with link to the completed render.
More details:
- Related settings are organized into collapsible panels. The size, position and expanded state of each section is remembered once you close the dialog.
- The task queue allows you to create multiple export tasks and run them all as a batch. A task in the export queue contains the set of export settings including the mix settings, export file name, selection, location, and the time range. The export queue is saved in the project and can be recalled and re-executed. Any prompts appear at the time of adding the task, so you can run the whole queue without any user intervention.
- To batch export all tasks in the task queue, click Run Tasks.
- To export a single job with the current export settings, click Export.
- Filename and location are shown as two separate fields. Filename is the name of the file you want your exported audio to be called, and location is the directory where it should be saved.
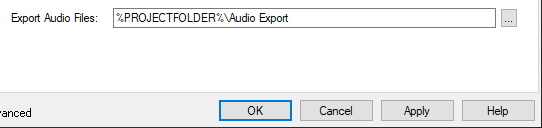
- When you first open the dialog, the location will be set to the default location as specified in Edit > Preferences > File - Folder Locations under Export Audio Files. The default is \Audio Exports under the current project directory, where the current project folder is indicated by the %PROJECTFOLDER% environment variable.
- You can change the export directory by clicking on the browse location button
 , and this location will be remembered for the duration of the project’s session. You can change the global export location for all projects with the Export Audio Files path in Edit > Preferences > File - Folder Locations.
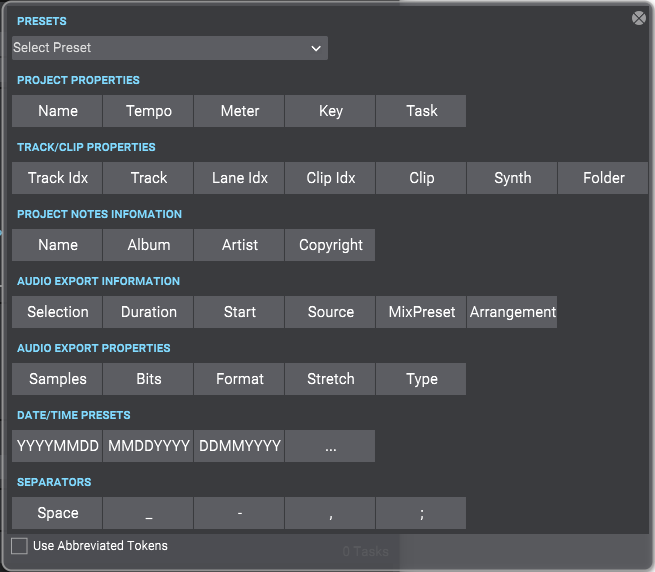
- Filename tokens. Filenames now support substitution tags for common project and export properties. You can type tags directly into the filename edit box, or use the filename builder pop-up to add them for you. You can still type while this pop-up is showing, so you can mix literal characters with tags, or use backspace to correct any mistakes.
- Filename presets let you save and recall custom filename formats.
- The filename itself now supports both literal characters and substitution tags (“tokens”). Substitution tags replace tags within the filename with common project and export properties. Each tag is contained within curly brackets.
- You can type in the tags directly into the filename edit box, or use the filename builder pop-up to add them for you. It’s worth mentioning that you can still type while this pop-up is showing, so you can mix literal characters with tags, or use backspace to correct any mistakes.
- A preview of the first audio export filename is shown below the filename edit box.
- The filename builder pop-up also support filename presets, so you can easily recall a formatted filename by selecting it from the drop-down. As with all Cakewalk presets, you can save new presets, replace existing ones, or delete one’s you don’t want.
- Export presets can now store a default filename.
- In the What to Export section, Track Folders has been added as a source category. This setting exports the tracks in each of the selected track folders as heard through the entire mix, as separate files. This provides yet another convenient way to export stems without modifying the source project.
- In addition to arrangements, individual Arranger sections are available as an export category. This allows you to export each individual section as a separate audio file.
- Under Format, the Bounce Buffer Size (ms) setting is used to specify the audio buffer size that will be used during export.
This value defaults to use the current playback buffer size and can be changed to a max size of 350 ms. A larger buffer size can speed up the export process in large projects by allowing the CPU to process data more efficiently. The Bounce Buffer Size settings only applies when Render in Real-time is disabled. The playback latency buffer size is used when Render in Real-time is enabled. - Tracks Through Entire Mix has been added as a new source category under What to Export. It exports individual tracks including all downstream bus effects and automation. The result is the same as if you solo one track at a time during export.
- When exporting multiple files as MP3 or Windows Media Advanced Streaming (WMA) format, the Export Options dialog box has a new Use These Settings for All option that lets you apply the same settings to all files instead of prompting for each file.
- Export works on the current project selection. The What to Export panel contains a fly-out project selection editor. This allows you to modify the current track selection and the mute and solo status of each track and bus, without exiting the Export Audio dialog box. This is especially convenient if you if you want to create several tasks, each with a different selection, or if you want to export multiple stems. Simply solo the tracks that you want to include in the stem, then add as a new task.
- A track that is checked means it’s included in the selection. If all the tracks are unchecked, that means there is no selection, and all tracks will be available.
- Changing the project selection changes which source items are available.
- A note about selection and the Tracks export category: When the source category is Tracks, the project selection has a special meaning:
- Having a project selection means there is also a time selection. So if you have tracks selected in your project selection, then all the tracks chosen in your audio source will be exported at exactly the length of the selection. In other words, the length of each tracks’ audio file will be the same.
- If you have nothing selected in your project, then no specific export time range has been set, and the length of each tracks’ audio file will be the length of each individual track.
- To the right of the What to export drop-down is a search filter, which lets you search for a particular track, bus, arrangement, section, or Mix Recall preset, should you have a large number of sources to search through.
- Tip: To quickly select all/none in the source list, hold down CTRL+SHIFT and click any checkbox. To select all, press CTRL+A. To check/uncheck the selected sources, press SPACEBAR.
- The Range panel specifies the time range to be exported. The drop-down provides the following choices:
- Entire Project = The entire length of the project.
- Time Selection = A specified time selection. The Start and End edit boxes allow you to manually enter the start and end times of the export range. Clicking the button to the left of the Start label will toggle between musical
 and absolute
  time. The
  buttons to the right of the Start and End edit boxes will allow you to choose a time based on defined project landmarks, such as the beginning of the project, the now time, or marker locations.
 - Set Time Selection to Loop Range = Set the time selection to the current loop region.
- Set Time Selection to Punch Range = Set the time selection to the current punch region.
Note: The 2021.09 Early Access installer will delete the old factory export presets and replace them with new and updated presets. If you have overwritten the factory preset names, those presets will be replaced. Other custom export presets will not be affected.
Batch exporting audio files using task queues
Using the Export button is fine if you have a single export. But what if you want to tweak your project and export again, or you want several different types of exports? You may want a task for exporting your stems, another task for exporting individual tracks, and another for exporting your final mix as a stereo file.
You can now create multiple export tasks, such as stems or different file formats, and add them to an export queue. A task in the export queue contains the set of export settings including the mix settings, filename, location, selection, and the time range. You can add as many export tasks as you like, and run all export tasks as a batch without any user intervention.
The task queue is per project and is saved with the project.
Adding a task to the queue
- To create a task, simply go through the normal process of defining your export, then instead of clicking the Export button, click the Add Task to Queue button
 . This adds a task with the current settings to the task queue.
If you are exporting multiple files as part of a task, a list of the filenames will be shown in a confirmation prompt. Any further prompts required for additional format settings will also be shown at this time… that way, you won’t get any prompts when you actually run the task. - Once you’ve confirmed any prompts, enter a name for your new task. Simply type the name of the task in, and press ENTER.
Tip: The name of the task can also be used in your filename by using the {taskname} tag. - Repeat the above steps for any additional tasks you need.
To the right of the task name you’ll see the number of files to be exported by each task, an estimated size (if it’s a wave file), and a summary of the file format.
Editing tasks in the task queue
You can update tasks that you already added to a task queue. To update an existing task:
- Do one of the following:
- Double-click on the task within the task list.
- Click the task’s menu button
 , then select Recall Task Settings.
The task’s settings are recalled in the Export Audio dialog box.
- Make any desired edits to the current export settings.
- Click the task’s menu button
 , then select Update Task with Current Settings.
The task is updated with the current settings. All other tasks in the task queue remain unchanged.
Renaming a task
To rename a task, do one of the following:
- Right-click the task and select Rename.
- Click the task’s menu button
 , then select Rename.
Duplicating a task
To duplicate an existing task:
- Do one of the following:
- Double-click on the task within the task list.
- Click the task’s menu button
 , then select Recall Task Settings.
This recalls all the task settings in the Export Audio dialog box.
- [Optional] Make any desired edits to the current export settings.
- Click Add Task to Queue.
Deleting tasks
- To delete a single task, right-click the task and select Delete, or click the task’s menu button
 , then select Delete.
 - To delete multiple tasks, select the tasks that you want to delete (Tip: press CTRL+A to select all tasks), then right-click any selected task and select Delete.
The task(s) is removed from the task queue.
Executing task queue export
To execute all checked tasks in the queue, click the Run Tasks button.
- The tasks in the queue are exported one after another.
- The status of each task is updated as the queue is executing, and a summary is shown in the task queue header.
- Once a task is completed, the task is unchecked.
- Checking a task resets it.
- Clicking on the Run Tasks button resets all checked tasks before executing each task.
- While the queue is running, the Run Tasks button changes to a Cancel button, which allows you to cancel the execution of the task queue at any time.
- The checked status of a task persists when opening/closing the Export Audio dialog box, and with the project.
Resetting a completed task
Tasks are automatically unchecked on successful completion. To reset a task so it will execute again the next time you click Run Tasks, simply check the task.
Canceling an in-progress queue export
While the queue is running, the Run Tasks button changes to a Cancel button, which allows you to cancel the execution of the task queue at any time.
Opening a task’s export location
To open a task’s export location, click the task’s menu button  , then select Open Export Location.
Using export filename tags and presets
You can now use “tokens” to define filenames for exported audio files. Tokens allow you to use placeholder tags that automatically extract the corresponding information (such as the project name, artist, sample rate, bit depth, current date or time, etc.) from a project and adds it to the resulting filename.
For example, instead of manually typing the project name and date into the filename edit box, you can enter the following:
{projectname}_{d}
This will automatically use the project’s name and the current date. Each token is enclosed by curly brackets (aka braces) e.g. {d}.
Adding filename tags
To enter a tag, do one of the following:
- Open the Tags panel and click a tag. You can still type while this pop-up is showing, so you can mix literal characters with tags, or use backspace to correct any mistakes.
- Type in the tags directly into the filename edit box. Be sure to enclose each token by curly brackets (aka braces) e.g. {d}. Tokens are case sensitive.
A preview of the first audio export filename is shown below the filename edit box.
To see all tokens that can be used to specify the filename, click the Build Filename Using Tags button  to open the Tags pop-up panel. To add a tag, click a tag button, or manually type the tag in the filename edit box.
 Below are some common tokens:
- Project name = {projectname} or {P}
- Name field in Notes Browser = {notesname} or {N}
- Artist field in Notes Browser = {notesartist} or {A}
- Sample rate = {samplerate} or {sr}
- Bit depth = {bitdepth} or {bd}
- Channel format = {channelformat} or {cf}
- Track name = {trackname} or {T}
- Track number = {tracknumber} or {t}
- Date = {d}
- Tempo = {tempo} or {b}
- Meter / time signature = {meter} or {m}
- Key = {key} or {k}
- Task = {taskname} or {TN}
Press the Build Filename Using Tags button to display all available tokens. Most tags have a long token and a short token. For example, the project name token can be {projectname} or {P}. Each tag’s tooltip shows its full and abbreviated tokens. To always use abbreviated tokens when you click a tag, select Use Abbreviated Tokens in the filename builder pop-up panel. You can freely use either format.
Tokens can be combined as in the examples below:
- {notesartist}_{notesname}_{d}
- {notesartist}_{notesname}_{samplerate}_{bitdepth}_{channelformat}_{d=Ymd}
You can combine tokens and regular text, as in the following example:
Client Name_{samplerate}Hz_{bitdepth}b_{channelformat}_{d=Ymd}
Saving filename presets
You can save your custom export filename format as a preset in the filename tag panel. To open the filename tag panel, click the Build Filename Using Tags button next to the filename edit box. To save the current filename as a preset, type a name in the Presets combobox, then click the drop-down menu and select Save Preset.
To delete a preset, select the preset in the Presets combobox, then click the drop-down menu and select Delete Preset.
By using filename tokens to define a naming scheme and saving the filename format as a preset, you can reuse the presets in any project without having to manually type a filename.
Misc. export enhancements
Improved handling of aux tracks and sidechains when exporting or soloing tracks
When exporting with source category Tracks, sidechain or aux track sends or outputs are now properly included in the export for the track containing the sidechain. The same applies to aux tracks. Please note that it is still necessary for the sending tracks to be included in the tracks exported. This limitation may be removed in the future.
When soloing a track that contains a sidechain plugin, any sends from other tracks in the project are now automatically included, similarly to how it behaves with sends to aux tracks.
Default ‘Export Audio Files’ folder
A new Export Audio Files folder path has been added to Edit > Preferences > File - Folder Locations. This path is used as the default location when you open the Export Audio dialog box. The default path is %PROJECTFOLDER%\Audio Export, which is an \Audio Exports subfolder in the current project directory. The current project folder is indicated by the %PROJECTFOLDER% environment variable.
Tip: If you change the folder path in the Export Audio dialog box, you can restore the %PROJECTFOLDER%\Audio Export path by opening Edit > Preferences > File - Folder Locations and clicking OK or Apply.
Toast notification with link to open export location
Upon completion of a single export job via the Export button, a toast notification appears with a link to open the export location in Windows Explorer.
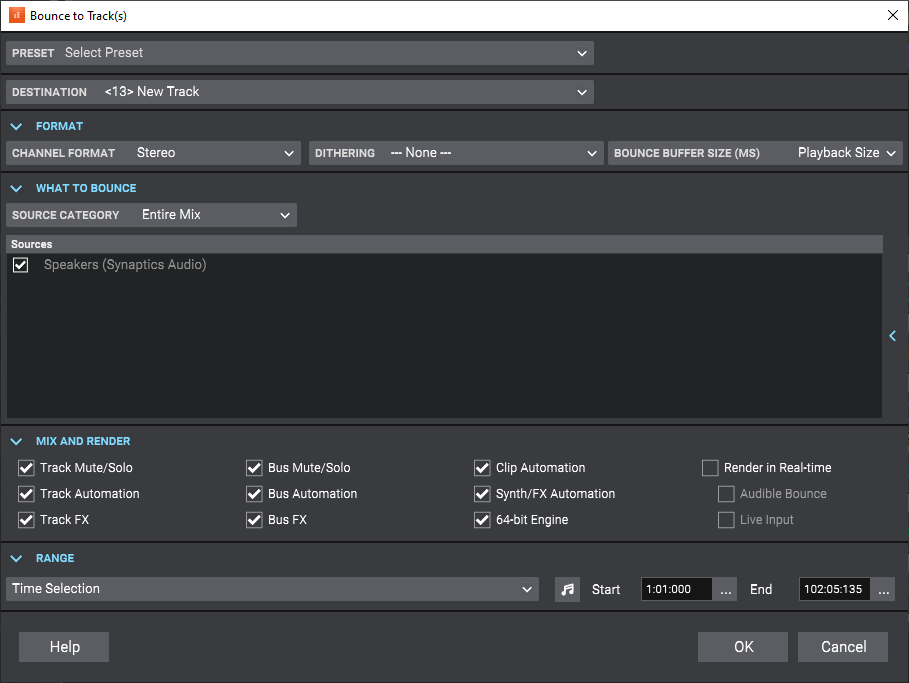
Updated Bounce to Track(s) dialog box
The Bounce to Tracks(s) dialog box has been redesigned similar to the Export Audio dialog box.
Improved AudioSnap transient detection
The transient detection algorithm has been greatly improved to more accurately detect audio transients in a variety of source material.
Transients are useful when using audio snap and are also used for time stretching as well as when snapping to the transient pool.
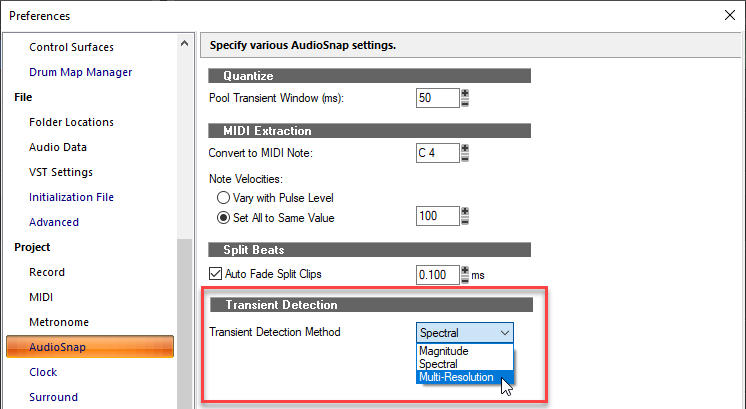
The AudioSnap transient detection method can now be specified in Edit > Preferences > Project - AudioSnap under Transient Detection. There are three methods:
- Magnitude
- Spectral (default for legacy projects)
- Multi-Resolution (default for new projects)
Multi-Resolution is the new default transient detection method for new projects, and Spectral and Magnitude are the older legacy modes. The Multi-Resolution transient detection algorithm provides improved transient analysis that works well with most audio source material.
The detection mode is stored in the project and older projects will continue to use Spectral until changed via Edit > Preferences > Project - AudioSnap.
NOTE: The new transient analysis will not be used by default on previously saved projects. You must explicitly pick the Multi-Resolution algorithm from Edit > Preferences > Project - AudioSnap before this will take effect for that project. Once you resave the project with this change it will continue to use the new algorithm for all audio.
When the detection method is changed, you will be prompted that project audio waveforms will be recomputed. After regeneration of the waveforms are complete, the new transients will be visible when switching the edit filter to Transients. The default transient threshold (available in the AudioSnap palette) is different for each transient detector mode. Note that any edited transients are retained when switching the transient detector mode.
Misc. enhancements
Mackie Control revspread VPot DataType
On the Mackie Control surface, a VPot’s datatype defines the type of control being edited and how it should be displayed on the VPot LED halo.
Currently, the Mackie Control surface supports a spread DataType for the LEDs that surround the VPots. The LEDs start in the middle for small values, then "spread" around the VPot for larger values.
With certain parameter types, such as an equalizer "Q" setting, where a small Q value means a large spread, and a large Q value means a narrow spread, the VPots show the opposite in the LED spread, which is confusing.
To address this, the Mackie Control surface now supports a new revspread VPot DataType that can be assigned in MackieControl.ini (C:\Program Files\Cakewalk\Shared Surfaces). With the revspread VPot DataType, high values show a narrow LED spread, and low values show a wide LED spread. This doesn't affect the actual numerical value being shown, just the way the LEDs spread around the VPot.
For details, see the instructions in MackieControl.ini.
Allow multiple MIDI files to be dragged into a project simultaneously
You can now import multiple MIDI files into a project by dragging from Windows or the Media Browser.
By default, multiple tracks are created. To import back-to-back instead, hold down CTRL+SHIFT when dragging the MIDI files into a project.
Bug fixes
Stability
- Crash Freezing Track with synth in project
- Crash when bouncing with sidechain FX
UI
- Aim Assist draws incorrectly after collapsing/expanding MultiDock
- Arm Tracks command arms hidden audio track in Instrument tracks
- Aim Assist can appear unexpectedly when turned off
- Selection module does not automatically update display after setting display times to SMPTE
Misc.
- Process slide not sliding some track envelopes
- Paste Special behaves unexpectedly when combining Paste to One Track and Paste Into Existing Clips
- When the Snap module set to Measure or any value below that in the list, the Snap Value drop box fails to turn snap on/off
- Save Copy As MIDI interferes with project cwp save
- Last File 1-4 key bindings are all linked unexpectedly
- Unable to copy/paste multiple Arranger tracks between projects
- Modal message boxes do not always disable the main app window
- Cannot copy special selection with tempos from SONAR to Cakewalk










 cakewalk中文版 v26.09附安装教程
 Band-in-a-Box® and RealBand 2024-123pan
 Muse 2.7 综合乐谱排版软件(支持五线谱_吉
 ZOOM R24作为音频接口和控制器在SONAR里如
 Cakewalk_by_BandLab_cakewalk中文版 v27.0